For truck or bus driver inspection of air brakes is 'MUST KNOW'!
How to Do the CDL Air Brake Pre-Trip
Closed Caption
Introduction
Hi there smart drivers, Rick Smart Drive Test talking to you today about the airbrakes and the pre-trip inspection that you need to do as part of your CDL license.
For those of you in the United States, the CDL license--the commercial driver's license--for those of you working towards becoming a truck or bus driver.
If you're operating a vehicle that has air brakes you're going have to be knowledgeable air brakes.
To do the CDL pre-trip inspection you must inspect the air brake components as part and parcel of your CDL license.
Now before we get started here I would like to thank Inland Kenworth here in Vernon, British Columbia, Canada for providing equipment and making this video possible.
Now for those of you in Canada, the airbrake pre-trip inspection is going to be part of your airbrake endorsement and that's going to be a separate requirement for getting your CDL license - your commercial driver's license.
Now quickly, safety first!
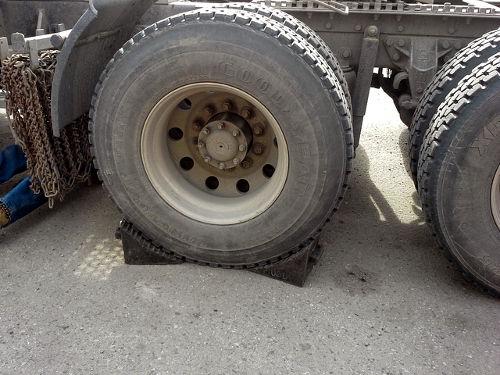
Make sure you chock the wheels, pump the air pressure up over 90 pounds per square inch, in order to be able to check the air brake for adjustment, and then release the parking brakes.
And make sure that you have the required amount of air to do the outside inspection of the components.
And your mantra for the outside components are: “secure, not damaged, not leaking."
And to check the air brakes, you're going to do the pry bar (free-stroke) method.
And this for the most part is the way to check air brakes.
There are some jurisdictions that will get you to do the applied stroke method.
There's another video here on the channel that will explain both the pry bar method and the applied stroke method.
After you do all the checks outside—lines, hoses, valves--check all the brakes for adjustment; you’re going to go in the cab, and there's five check in the cab.
You're gonna check the governor, the low-air warning ensure that the spring brakes apply between 20 and 45psi.
You're going to check the compressor that it builds with set volume of air in a prescribed amount of time.
And then finally you’re to do a leak test.
And the very last test is a tug test on the parking brake and do a response test on the service brakes.
We are going to go over all of that today in more detail, so stick around we'll be right back with that information
[OPENING CREDITS & MUSIC]
Prologue
 Hi there smart drivers, welcome back.
Rick with Smart Drive Test talking to you today about the airbrake pre-trip and what you need to do for the purposes of an airbrake endorsement.
Essentially what you need to do is check the components and what you're going to say is: “secure, not damaged, not leaking.” because the components have air in them.
And the first step that you do for the purposes of your pre-trip inspection is chock the wheels, release the parking brakes and ensure that you have over 90 pounds of pressure, because you need to check pushrod travel adjustment on the brakes to ensure that they're in adjustment for the purposes of a pre-trip inspection.
So you have to release the parking brake and make sure that you have over 90 pounds of pressure in the system.
Air Tanks
And for the pre-trip inspection for your air brakes you have to test the air tanks.
Essentially the air tanks on this truck are underneath the step, so these air tanks are up underneath the steps here.
Often times, the air tanks will be up underneath the frame, and other places on the vehicle.
For a pre-trip inspection of air brakes on an older model that doesn't have an ADIS (Air Dryer Integrated System) as we said this vehicle has an ADIS system so it only has a primary and a secondary tank - it doesn't have a wet tank.
The older models will have a wet tank, and as part of your pre-trip inspection, the first step is to drain the wet tank.
And the way that you find the wet tank on an older vehicle is you go in the cab take note of what the pressure is on the two pressure gauges - because you only have pressure gauges on the primary and secondary tank.
You don’t have a pressure gauge on the wet tank.
So you take note of what the pressure is, go outside and start draining tanks.
The tank that you drain that doesn't drop the needles on the dash is your wet tank.
Checking the Primary & Secondary Sub-Systems
Drain that tank completely.
And the reason you're draining the wet tank completely is to determine if the one-way check valves are working at the entrance to the primary and secondary tanks.
After you drain the wet tank completely, you go in and see if the needles have dropped; if they haven't dropped, your one-way check valves are working.
The one-way check valves are primarily responsible for dividing the system into two independent subsystems - the primary and secondary subsystems.
So if one system fails, the other will continue to work normally, so long as the compressor continues to work.
So you have to drain the wet tank on older systems to check the one-way check valves and ensure that your two independent subsystems are working.
Now to check the air tanks on this system, the ADIS system, you just have a primary and secondary tank and these are “secure, not damaged, not leaking.”
And you're listening for audible air leaks and making sure that the drain valves are working.
[RELEASING AIR FROM THE TANK].
You can see that there isn't any moisture coming out of there or any other contaminants.
Air Dryers are Really Good
Actually, filter technology is really good on these newer units and it's improved vastly in the last decade or so.
And so there's very little contaminants.
As well as the air dryer is incredibly effective at ridding the air of moisture and other contaminants.
So those are the air tanks that you have to check and on most newer vehicles you're going to have an ADIS system.
Air Compressors Are Parasitic
 The air compressor is secure, not damaged, not leaking.
It's bolted to the side of the engine.
Nothing flew up and hit it and it's not leaking because there's oil inside.
It uses the engine lubrication system to lubricate the air compressor.
And so there is any oil leaking out of it.
And it's in behind here on this Cummins.
It's actually kind of hard to find, but just point to it, light touch, “Secure, not damaged, not leaking.
The lines, hoses, and valves which are up here on the firewall “secure, not damaged, not leaking.”
You can listen for air leaks, and you don't hear anything.
All the lines are secure and none of them are hanging down.
The line out to the brake chamber is not damaged, not leaking.
ABS (Anit-Lock Braking Systems)
You can see that there's a wire on this one, which means that the brakes have ABS (Anti-Lock Braking System) on them.
You will also be able to tell that from the dash, because you'll turn the key to the ON position, wait momentarily and the ABS light will come on and then go out.
The light indicates that the ABS are working normally.
Determining If The Brakes Are in Adjustment
For the purposes of this pre-trip inspection test we're going to use the pry bar method.
I'll put a video up here for you on how to test adjustment on brakes using the free stroke method and the applied stroke method.
We're going to use the pry bar method.
Essentially just put the pry bar in here and half to three-quarters of the width of your thumbnail in terms of pry bar for the slack adjuster slack adjusters.
All the components of the brakes in the inside of the hub is all secure not damaged.
That's essentially all that you do for the purposes of checking this side of the engine.
It's just the air brake components.
We're going to go around to the other side of the motor.
Passenger Side
So on the passenger side of the vehicle there isn't very much on this side of the vehicle because there aren't any air brake components on this side of the vehicle.
So essentially you're checking is the line out to the brake chamber.
The brake chamber is secure, not damage - the wire for the ABS is all of that check.
The push rod travels is within half to three quarters of an inch on the pushrod travel for the free stroke method.
And checking the inside of the hub, there's nothing on the inside of the hub – it is secure and everything is not damaged.
And the lines of wires for the ABS valve, which you can see back up in here is secure, not damaged.
All the wires, lines, and hoses are good.
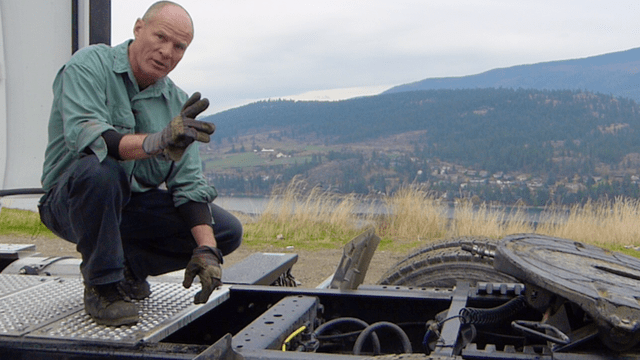
Underneath the Vehicle
So we’re underneath the truck and we're doing the pry bar method to check pushrod travel to ensure that it's within limits.
So we pull the pushrod out, and we can see the yellow marker is coming out - essentially not even the width of my thumbnail, so it's within half to three-quarters of an inch - well within the inch in the state of California.
And you're going to check the brake chambers because you have the brakes released and the wheels chocked.
And there's air inside the brake chambers and you're listening for air leaks.
I don't hear any air leaks - the lines, and hoses are all secure, not damaged, and not in any danger being ripped off or being caught in the moving parts.
And we can see the valves are all secure, and not damaged as well.
So essentially, just put your pry bar on the pushrod and determine that it doesn’t extend more than half to three quarters out of the brake chamber.
As well, to determine adjustment, you're going to do the same on the other three brake chambers underneath the truck.
The Back of the Vehicle from the Top
 Most driving schools, if you're doing a class 3 for air brakes and you're getting your airbrake endorsement are not going to have a dump truck or box on the back of the truck.
It's unlikely they're going to because most of the driving schools use a tractor for dual purpose: for Class 1 and Class 3 - in Ontario it’s Class A or Class D.
And if you're doing an airbrake pre-trip inspection you can just stand up here on the deck and just look and you can see the brake chambers, and you can see all the lines and valves and hoses.
And basically you stand here and then go to the rear of the truck and you inspect the lines, hoses, brake chambers, and valves - all secure, not damaged, and not leaking.
Because of course there's air in the system, the wheels are chocked, and the parking brakes are released.
And if there are any leaks as well when you're up on the deck, you will hear those.
And you can check all the lines and hoses on the back of the cab and check your glad-hand connections as well that they're secure and they're not going to be dragging down.
So that's the final part for the outside air brake pre-trip inspection for the purposes of getting an airbrake endorsement or in British Columbia, a Code 15 or in the United States, air brakes as part of your CDL license.
Airbrake Pre-Trip - In Cab
So after you do everything outside of the vehicle you inspect all the components secure, not damaged, not leaking and determined that everything is safe on the vehicle and not leaking and nothing is damaged then you come into the cab.
And you release the parking brakes.
You've already released, so just check to make sure the brakes are released.
And the vehicle is not moving obviously because you chocked the wheels first - safety first.
Never go under a vehicle that doesn't have wheel chocks in.
And the first thing you're going to do is you’re going to start the engine.
Turn the key to the ON position and as I said before, let the gauges cycle through, wait for the lights on the dash go out and then fire up the truck.
So the truck’s dash lights have gone out, and on all new vehicles you're going to have to push in the clutch to get the engine to start.
The first step you're going to have to make sure that you have over 90 pounds of pressure in the system.
So right now we've got the little under 90 pounds.
So we're just going to throttle up a little bit and let it build up air pressure over 90 pounds.
So essentially for those drivers working in different jurisdictions, the numbers are going to be slightly different.
But essentially for the purposes of a Class-3 (Class D) road test to do an airbrake endorsement, you're going to have certain tests:
1) you got to do the minimum and maximum pressure on the governor;
2) the low-air warning device - check and make sure it activates.
In this day and age, they're all going to be audible and visual.
In other words you’re going to be able to hear it and you're going to be able to see it;
3) you’re going to check to make sure that the spring brakes activate automatically between 20 and 45psi.
4) And how much pressure that the air compressor can build.
Most of the times it’s 50 to 90 pounds within three minutes.
In other jurisdictions, I know for a fact that it’s 85-100psi in 2 minutes.
Essentially what you have to do with the compressor is determine that it builds a set volume of air in a certain amount of time to determine that it is working.
1b) You’re going to check the maximum setting of the governor, which is the hardest part for most people.
You listen for the air dryer to purge, but the air dryer is not definitive trait that shows you that the system is at maximum pressure.
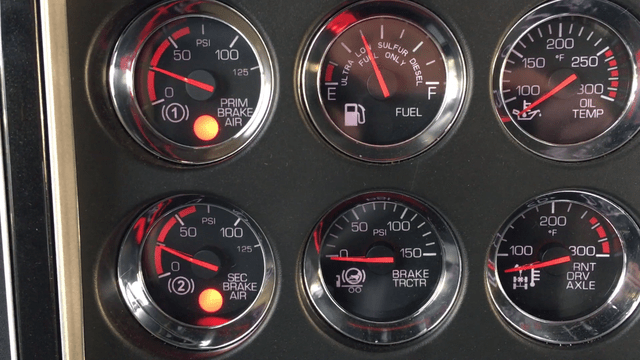
I hear the air dryer purge, and you check the needles to see that these are between a 100psi a 135psi and these have stopped climbing and therefore you know the system is at maximum pressure.
And therefore the governor has put the compressor into the unload phase or cut out phase.
5) And shut the vehicle and do a leak test.
On a single unit you're allowed to lose three pounds; on a tractor unit, four pounds; and on multiple trailers, six pounds.
So just to reiterate the tests inside the cab on an airbrake system: 1) minimum and maximum on the governor; 2) low-air warning; 3) spring brake supply automatic between 20 and 45;
The compressor is able to build a set volume of air in a certain amount of time;
And a leak test when the system goes to a maximum setting.
Some driving schools, if you're going to a driving school, will have different sequences of how you do the in-cab cab.
Essentially some of them might get you to build up a maximum pressure, but for me it's just up to a hundred, and then pumped down and you can see on this system here there is a lag, and there will be on a lot of systems it is going to have a lag from the time that you fan the brakes down, pump the brakes to exhaust air from the system to the time it shows up on the gauge.
Governor Test - Minimum Setting
Essentially we're at 90 pounds, actually we're a little bit less - it has to be above 80psi.
If the pressure goes below 80 pounds, your test to test the governor's minimum setting and returns the compressors to the load phase or the cut in phase is going to be void - so make sure you don't go below 80psi.
And the needles are rising, therefore I know that the governor has put the compressor back into the load phase or the cut in and phase.
Low-Air Warning Test
 The next test is to pump down to 60psi and test the low-air warning.
The low-air warning must activate above 60psi and a lot of vehicle of the low-air warning is going to come on well about 60 psi.
So on this one it came on at about 60psi.
You can hear that it's audible and I can also see that there's a light on the dash telling me that I have low pressure in the system.
Spring Brakes Apply Automatically
Next one I'm going to shut off the motor, otherwise I’m just working against the compressor to try and get the spring brake to work.
So we're going to continue to pump down until the parking brakes apply automatically.
So I have to turn the key on to get the air pressure needles to work.
My needles are between 20 and 45psi and the spring brakes activated automatically.
The air brake system passed the test.
Compressor Test
We're going to do is we're gonna fire the engine back up and at a high idle - a high idle is between 1000 and 1,200.
The compressor has to build 50 to 90psi in 3 minutes.
I start my timer and the ADIS system is going to load one system--the primary and the secondary systems first--and then it will load the other one--so it's the first needle to 50psi, and the second needle to 90psi on the system.
So the first gauge has gone to 90psi, now my other needle has started coming up.
And certainly the low-air warning has gone out above 60psi.
That’s the other things you can indicate on the way up.
It's not a marketable on a road test, but you just want to indicate that the low-air warning has gone out.
And the system has built 50-90psi well within three minutes at a high idle.
When the system gets to 90psi, release the parking brake - release your parking brakes.
You fill the air back up and fill the spring brake chambers for the purposes of your leak test.
Governor Test - Maximum Setting
When the system builds to 90 pounds and you've done your compressor test, release the parking brake and then build to maximum pressure.
So “I hear I, and I see.” I heard the air dryer purge, and I see that the system is between a 100 and 135psi, therefore I know that the air brake system is at maximum pressure and the governor has put the compressor into the unload or cut out pressure.
And I know that it’s maximum pressure because the needles have stopped climbing.
Leak Test
Now I just shut the engine off an do a full service brake application.
I push down on the foot brake as hard as I can or 1 minute – it is the longest one minute of your life.
And in other jurisdictions--in the province of Alberta--I know for a fact they do it for 2 minutes on a leak test.
And you push down on the service brakes--full brake application--otherwise you're not going to be able to know if there are leaks in the system.
And you can roll down your window, listening for air leaks.
And after the initial drop, you're not allowed to lose more than three pounds on a single unit, four pounds on a truck and trailer, and six pounds on a truck with two trailers.
And we can hear that small air leak on this truck that we talked about earlier in other videos.
Essentially it's not losing any air - it's holding at a hundred pounds per square inch.
And you time for one minute, and after one minute you state to the examiner that you did not lose more than three pounds of pressure within one minute.
And that's how you do your in-cab pre-trip inspection.
In-Cab Review
So just quickly review – you’ve got to test the minimum and maximum settings of the governor, that it returns the governor returns the compressor to the load phase or the cut in phase.
And a maximum pressure it returns the compressor to the unload or cut-out phase.
You have to check that the low-air warning that comes on at 60psi or above; that the spring brakes apply between 20 and 45psi when you pump down the air.
And be sure to shut the motor off because you don't want to be fighting the compressor when you're trying to pump down between 20 and 45psi, because the compressor builds a lot of air.
The next test you have to do is the compressor test.
That it's working - that it builds a set volume of air within as prescribed amount of time at high idle.
And different jurisdictions will have different parameters, but the most common test is 50 to 90 pounds per square inch within three minutes.
At maximum system pressure I hear I see.
I hear the air dryer unload and I see the needles have stopped climbing between 100 and 135psi, therefore the system is at maximum pressure and the governor has put the compressor into the unload or cut out phase.
Next you shut the truck off.
Back up there for a second…after you get 90 psi, you can release the parking brakes.
As I said, at maximum pressure, you test the maximum setting of the governor.
Shut the truck off and make a full service brake application: on a single unit you're allowed to lose three pounds in a minute after the initial drop; four pounds on the truck and trailer; and six pounds in the truck with two trailers.
The last part of the pre-trip inspection is going to be a tug test on the parking brakes and a response test on the service brake.
So what you're going to do is apply the parking brakes, get out of the cab and remove your wheel chocks and stow your wheel chocks.
Tug & Response Tests of Spring & Service Brakes
Get back in the truck and start the engine.
Make sure you have more than 90 pounds of pressure and on a single unit you're going to apply the parking brake and put it into a low gear and try to move the vehicle forward.
If it doesn't move the parking brakes are working.
And then you're going to release the parking brake, put it in low gear and roll ahead two or three feet and apply the service brakes.
And it’s a response test because you're testing that the service brakes apply and the service brakes release.
And at that juncture you're done.
You’re going to apply the parking brakes and you're going to fill out your pre-trip inspection form.
So that's the last part of your air brake pre-trip inspection.
Conclusion
Quick review on the air brake inspection for the purposes of a road test to get your CDL license.
You have to do an airbrake pre-trip inspection either as part of your complete pre-trip inspection or you're going to do it independently.
If you're in Canada, you're going to be doing an airbrake endorsement and you have to do a pre-trip inspection independently of your pre-trip inspection.
Now if you're going to a driving school and you're upgrading your license as part of your pre-trip inspection when you do your road test you're gonna do your practical air brake test at that point.
So the first step of the pre-trip inspection is to chock the wheels, make sure you have more than 90 psi in the system, and release the parking brakes.
And when you release the parking brakes, keep your foot over the service brake pedal in case the chocks don't hold.
And then ensure that you have more than 90psi pressure in the system.
You're going to check your air tanks.
If it's an older system, you're going to drain the wet tank and we talked about how to find the wet tank.
You're going to do that to check the one-way check valves and to ensure that the division of the system into two independent subsystem is working properly.
So after you do that, then you're going to go under the hood and check on the driver side.
You're going to check the compressor - most of the time it's found on the driver's side.
Check the governor, the hoses and wires.
Check all of that and make sure it's secure, not damaged, and not leaking.
Check adjustment of the push rod on the front.
You’re going to go to the passenger side - on some trucks the air dryer will be over there as well.
And again, check the adjustment on brake chamber and push rod on that side of the truck.
Then you're going to go around the truck the other side of the truck at the rear of the truck.
Check all lines and hoses on the areas at the back the truck.
And check the adjustment on all of the brake chambers underneath the back.
Now if you're doing the pry bar method, you are simply going to get underneath the truck and pull on the push rod and see if it extends out of the brake chamber the width of your thumbnail.
If it doesn't extend out more than the width of your thumbnail then the brakes are within adjustment.
All the hoses, lines, and wires are secure and not damaged.
Then you're gonna come in the cab and in the cab you have five checks that you have to do for the purposes of the airbrake pre-trip inspection.
You test the governor - the minimum and maximum settings; you test the low-air warning; you ensure that the spring brake apply between 20 and 45 psi.
After you have tested that the spring brakes apply then you're going to do a compressor test.
Check to see if it builds a set volume of air and prescribed amount of time.
Then you're going to build to maximum pressure.
When you finish the compressor test, you're going to push in the parking brakes and build to maximum pressure.
You know it's at maximum pressure because you hear the air dryer purge and you confirm that by looking at the needles and the needle are between a hundred and hundred thirty-five pounds and have stopped climbing.
That's how you know the system is a maximum pressure and the governor has put the compressor into the unload or cut out phase.
And then the last test is your leak test.
And the very last part of your pre-trip inspection is to apply the parking brakes, remove and stow the wheel chocks, and do a tug test on the parking brakes and a response test on the service brake.
So that's the last test of your pre-trip inspection for the air brakes.
And after you finish all that, you have to fill out your pre-trip inspection form because you have to write it down and it's a legal document and you have to prove that you in fact fulfill the requirements of a commercial driver's license.
So that's how you do an airbrake pre-trip inspection.
And again if you have any questions at all, send me an email.
I’ll be happy to help you with the specific numbers, because the specific numbers for the in-cab pre-trip might be a little bit different depending on your jurisdiction.
Question for my smart drivers:
Do you use the primary method or the applied stroke method to check the air brake in your jurisdiction where you live?
What is the required method for checking the airbrake adjustment?
Leave a comment down in the comment section there, all that helps out the new drivers working towards getting their CDL license and learning how to drive.
Again I would like to thank Inland Kenworth for providing equipment to make this video possible.
Without the equipment, it's pretty tough to make a video about airbrake pre-trip inspection.
Salutations
Thanks so much for watching.
If you like what you see here share, subscribe, leave a comment down in the comment section.
As well, hit that thumbs up button.
Check out all the video here on the channel if you're working towards the license or starting a career as a truck or bus driver – great information here.
As well, head over website - more great information over there and online courses that you can purchase.
Stick around to the end of the video, funny bits and links to the other videos and to my website.
Thanks again for watching.
Good luck on your road test.
And remember, pick the best answer not necessarily the right answer.
Have a great day.
Bye no
….
a little bit different depending on your jurisdiction.
Question for my smart drivers: what is the question for my smart drivers [EXHALING AND PONDERING] what is the questions for my smart drivers?
[CLOSING CREDITS & MUSIC]