Learn how to parallel park using cones - watch the video.
How to Parallel Park with Cones | Step by Step Instructions
Closed Caption
Introduction
Hi there smart drivers.
Rick with Smart Drive Test talking to you today about parallel parking for the purposes of passing a road test.And how to parallel park between cones.So stick around, we'll be right back with that information.
[INTRO & MUSIC]
Hi there smart drivers, welcome back.
Rick with Smart Drive Test talking to you today about parallel parking between cones.
I had a comment from nikelnichol.
I also had a comment from Nicolas Mazer and both of those smart drivers wanted me to do a video on how to park between cones for the purposes of passing a road test.
About a year ago, I also had requests from WorstNightmare666 who also wanted me to do this.
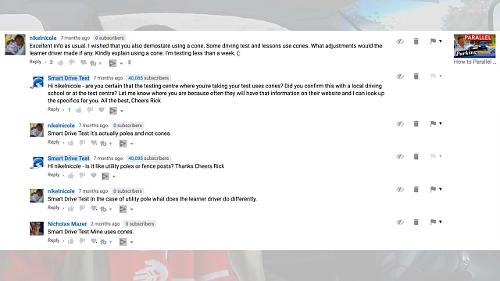 Smart Drive Test received several request for a video on how to parallel park with cones.
And I should have done this a lot earlier.
So I do apologize for the delay in getting this video up for you.
So that's what we're gonna work on today.
Now the first thing you're gonna need is you're going to need those 36 inch tall, 1 meter tall pylons.Sometimes called delineators.
And you could pick those up at a rental shop for about $10 for four of them for the day.
So they're inexpensive.
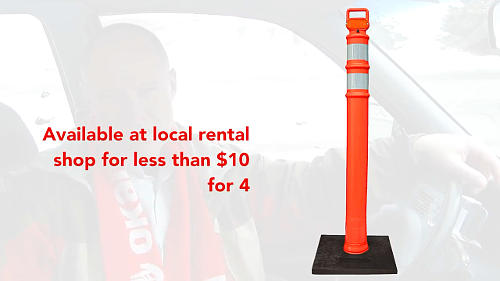 For the purposes of learning to parallel park with cones, you can rent the 3'ft (1m) tall delineators from any industrial equipment rental shop.
Now just before we get started here, if you're new to Smart Drive Test, Smart Drive Test helps new drivers get a license regardless of class, whether you're going for a car, truck, or bus license, we help you pass any one of those road tests.
As well, we help commercial drivers start a career as a truck or bus driver.
So if you're new here, be sure to hit that subscribe button.
As well, hit that bell, that way you'll get instant notification or the videos when I get them up for you.
Now parallel parking between cones for the purposes of passing a road test.
If you haven't seen the parallel park video already about parking behind a single vehicle or between two vehicles, definitely have a look at that.
 How to parallel park to pass your driver's test. This video will give you step-by-step instructions to pass your driver's test first time.
I'll put the card up in the corner for you and have a look at that video.
|
LEARN THE SECRETS THAT DRIVING SCHOOLS DON'T TELL YOU!• FEAR :: Know that you WON'T have to face friends & family and tell them you didn't pass;• SELF-CONFIDENCE :: Get the exact skills from a licensed driving instructor that will guarantee your success;• CONFUSION :: Cut through the conflicting driving procedures information;• QUALIFIED :: Smart Drive Test has helped 1000s pass their driver's test...and we can help you! |

Now parallel parking between cones tends to be a little bit easier because you got better reference points.
And we're gonna go over that now.
The first thing you need to do, is you need to set up the cones.
You want to set up the cones, as you can see here in the video, approximately a foot wider than the width of your vehicle.
You want to put the cone 12 inches or 20 centimeters on either side of the car; on the passenger side and the driver's side.
And for the length of the vehicle you want to put the cones one and a half vehicle lengths.
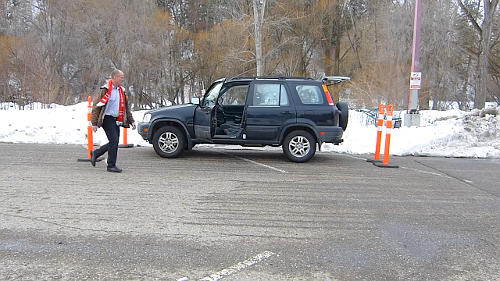 When placing the cones, put these approximately one and one half times the length of your vehicle and 1 foot on either side of your vehicle. As your skill improves, move the cones closer together.
So simply park your vehicle where you want it to end up when you finish your parallel park and place the cones at the front and then approximately another half a length behind the vehicle.
Put the cones behind the vehicle at approximately the same distance on the driver side and the passenger side.
As you get better and better and more comfortable with parallel parking, you can move the cones in and narrow the space that you're going to park into.
But for most of these driving centers, the cones are going to be one and a half vehicle length distance between the front and the back.
And the reason for that is because any tighter than that and it's just too difficult for new drivers to be able to do that.
So that's how you set up the cones.
It's not a specific feet and inches or a specific measurement for setting the cones up.
Just put them around your vehicle and make them relative.
And as I said, as you get better and better and you're working on this aspect of preparation for your road test, just move the cones in a closer and essentially that's all it is.
So what we're gonna do here is we're gonna hook up the cameras--the other camera--so you can see everything going on here, and we're gonna do a couple of parallel parks.
And I'll go through it step-by-step and give you instructions on how to do this.
Parallel Parking Between Cones
Park #1
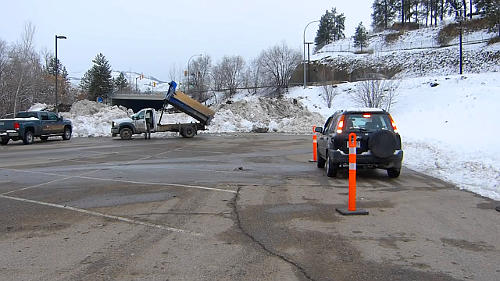
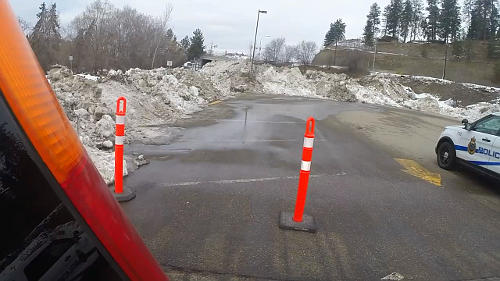
So we come up here and we line up the vehicle so we're about two to three feet away from the pylon at the front.
And essentially what we want to do--it's the same as in the other parallel park video--we want to bring it so we can see that pylon through the back window..right at the back corner there and you can see that in the image there where you want to line that up.
 Any time that you're parking, be sure to signal approximately 1/2 block from where you're going to park to ensure that others know what you're doing.
Okay we put our signal on to the right.
[YOU MUST SIGNAL AS YOU APPROACH THE SPACE]
Put the vehicle into reverse because we want the reverse lights to activate right away.And we're ready to back up.
Now on this one with cones, it's a lot easier because you don't have to pick out a 45°-degree marker.
All you need to do is turn the steering wheel all the way to the right and when you see the two pylons at the back in the driver's mirror that's when you know to straighten your steering wheel out.
So we start to back up.
We turn the steering wheel all the way to the right and we back up.
When we watch this mirror here--driver's side wing mirror--and as we're backing up...
we're almost there. We can see the two pylons now in the driver's mirror here.
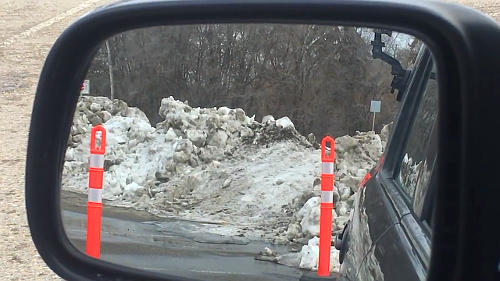 When you're reversing in to parallel park between cones, the 2 rear cones in the mirror is the indicator that you straighten the wheel.
You can see that in the image.
When you can see the two pylons, we straighten the steering wheel out, and we bring the front pylon all the way...so it's just past the passenger pillar on the front of the vehicle here.
When that's in the front of the pillar we turn the steering wheel all the way to the left.
And we nice and easy, gently bring it back and we look behind us so we don't drive into the pylons.
And when the vehicle...and you want to stop and pause and look and make sure that you're straight forward here.
As you're straight forward here, that's when you put it into a forward gear and we pull up.
We straighten our the steering wheel out and we drive forward until we're just close to the pylons at the front of the vehicle.
And you can see that in the camera there.
 When parallel parking between cones and you straighten the wheel, you bring the front of the vehicle in when the front cone is just past the pillar on the passenger's side.
And that's all there is to it.
It's actually easier I believe to parallel park between cones.
First of all the fear and trepidation of actually hitting another vehicle is gone.
Because if you bump a cone, it's not a big deal.
If you bump somebody's car it's a big deal because then you got insurance, and you know the shame of actually telling them that you hit their car and those sorts of things.
So it's actually easier.
So this is a great exercise for you to learn how to drive and learn spatial relationships of your vehicle when you're doing slow-speed maneuvers.
Securing the Vehicle
So you know get a bit rammy with it and figure out where the vehicle is in space in place.
And this will help you do that and we're gonna go around we're going to do one more parallel park.
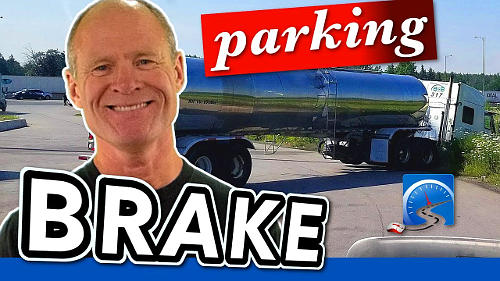 Every time you park the vehicle--for both a driver's test and afterward--be sure to apply the parking brake. This habit will ensure that your vehicle stays where you left it.
And it's the same thing for the purposes of the road test.
Once you get to this point here you put the vehicle into a forward gear hold the foot brake and apply the parking brake and then shut the vehicle off.
Because you're gonna do a road test and on a road test they expect you to leave the vehicle.
So you're gonna secure the vehicle--and you can hear the beeping--but you secure the vehicle.
So you keep your foot on the foot brake, apply the park, into a forward gear.
It's going to be into Park on an automatic.
And then you shut the vehicle off.
Now for the purposes of a road test, you're probably not gonna shut it off, but we're gonna do that.
Leaving the Space
So in with the clutch, start it up.
Into reverse.
You got your foot on the foot brake, release the parking brake, look behind you, back up so you're near the cones.
 When leaving the space after parallel parking, you're first going to reverse 2-3' ft to get some space to move out safely. Do a 360° scan before backing.
And again, this is an exercise that you can do.
And looking, backing up.
Okay, mirror, signal, shoulder check over to the left.
Into a forward gear--into drive for those of you driving an automatic in North America.
And we simply shoulder check again immediately before we move.
And you go slow because remember the vehicle turns sharper the slower you go.
The slower you go, the sharper the vehicle turns.
That's true with any vehicle.
So that's how you come out.
 Scanning is a critical skill for both passing a driver's test and being a safer, smarter driver.
Mirror, signal, shoulder check all the way to left and then steer around to the other side.
And we'll go back around and we'll do it one more time and we'll make sure you get all the pieces in place for you to parallel park between cones.
Parallel Park #2
All right, we're coming up we got our signal on before.
We're coming up.We're positioning the vehicle two to three feet away from the cones.
We position the vehicle so we can see the cone in the window at the rear window on the passenger side the back door of the passenger side.
Okay, into reverse right away.
We've got our signal on.
Okay we don't need to pick out a 45° degree marker on this one because what we're gonna do is we're gonna see the two rear cones in the driver's wing mirror.
Okay, we start moving the vehicle back.
All the way to that way--to the right--on the steering wheel [CHUCKLING] and we look--in this mirror we can see both cones in this driver's wing mirror.
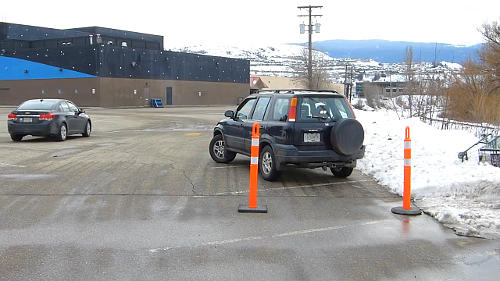 When parallel parking with cones, you'll bring the front end into the space when the front cone is just past the 'A' pillar on the passenger's side. This part may require adjustment depending on your vehicle.
That's when you straighten the wheel out one and a half turns back to straight.
This way will straighten the wheel out.
We come back until the front cone is just in front of the passenger door pillar.
So now we've got the cone in front of the pillar.
And now we turn the steering wheel all the way to the left.
Nice and slow going back, and we look out the back window.
And we come back and just about straight...right there we're straight in the space.
Put the vehicle into a forward gear and we bring the steering wheel all the way back one and a half turns to the right to bring it to straight.
We're actually gonna bring the front end just a little bit over and we pull up so we're just near the cones.
And then we stop.
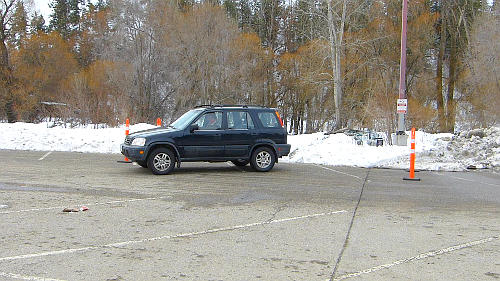 When parallel parking with cones, work to get the vehicle centred between the front and rear cones as best you can. If you're off a bit, don't stress.
Okay, so we're in the space and we've secured the vehicle.
We've shut it off and now we're going to get ready to leave again.
You put your foot on the foot brake, release the parking brake.
Into reverse, look out the back window and back up near the cones.
And we back up near the cones.
We're near the cones.
Left signal on, forward gear, mirror, signal, shoulder check.
The police car is not too close and we go nice and slow.
Because again, the vehicle will turn sharper the slower you go.
So we go nice and slow out of the parking space and around the cone.
 While shooting this video, the railway police came to see what I was doing there in the parking lot.
And that's all there is to it.
Conclusion
Quick review of parallel parking between cones for the purposes of passing a road test.
All of the landmarks, and all of the same techniques and skills that you saw in the parallel parking video between and behind another vehicle apply to parking between cones.
The only difference is the reference points are a little bit different.
You still want to pull up so you see the first cone at the front up here in the passenger side back door window.
And you can see that in the image here where you want that marker to be.
 If you hit a cone when parallel parking on your driver's test, it's an automatic fail. Better to be a bit off, than strike the cone...go SLOW!
Then you turn the steering wheel all the way to the right.
Back up until you can see the two cones at the rear in the driver's side mirror.
When you can see that, then you straighten your wheel out and continue to back up until you can see the front cone just past the pillar on the passenger side.
And then you turn the steering wheel all the way to the left.
Continue to back up until the vehicle is straight.
And the other thing is is that when you back in to get the vehicle straight, don't just be looking backwards; look forward to and that will give you a reference point of whether the vehicle is straight in the space or not.
Once you get straight in the space then you simply pull up, and do a bit of an adjustment to get the vehicle straight in the space.
When parallel parking with cones on your driver's test, there may be other activity around you. Focus on what you're doing!
And then you secure the vehicle.
Keep your foot on the foot brake, apply the parking brake, put it into a forward gear if you're driving a manual transmission.
If you're driving an automatic, put it into park because for the purposes of the road test they're going to want to see that you can secure the vehicle because they're anticipating that you're going to leave because you parked the vehicle and you're leaving.
Right, so you need to secure the vehicle, then when you leave the parking space, you put the vehicle in reverse and back up.
You need to look out the back window before you put the vehicle in motion.
That is imperative on a road test because if you don't look before you put the vehicle in motion, unfortunately you're gonna fail your road test.
You won't be successful.
So you back up close to the cones at the back and then put your left signal on.
You signal, mirror, shoulder check and then begin to pull out.And then just before you pull out, shoulder check again and remember the slower you go the sharper the vehicle turns.
So make sure you go slow when doing these maneuvers.
And this is a really good exercise.
As you get better and better at it, you can move the cones in closer and that way it'll teach you how to drive.
It'll also teach you where the vehicle is in space and place while you're learning how to drive.
So that's how you can do it between cones.
 Do they parallel park with cones at the test centre where you're taking your driver's test?
Questions for my smart drivers:
Do you have a driving center that is going to get you to parallel park between cones for the purposes of a road test?
Leave a comment down in the comment section there.
All of that helps out the new drivers working towards getting their license and passing a road test.
If you like what you see here share, subscribe, leave a comment down in the comment section.As well, hit that thumbs up button.
Head over to the Smart Drive Test website and pick up PASS your road test first time.
It's a course for new drivers that will ensure and guarantee that you pass both your theory and your practical test first time.
Because you don't want to fail, especially if you have to go to school the next day and tell your friends you weren't successful on your road test.
 Consider purchasing "Pass Your Driver's Test First Time...Guaranteed." This course will give you the precise information you need to pass your driver's test first time.
So look down a description there and get the thirty percent off coupon.
So head over to the Smart Drive Test website and get that course and pass your road test first time.Because we all know, failing a road test is a real drag
I'm Rick with Smart Drive Test.
Thanks very much for watching.Good luck on your road test.And remember, pick the best answer not necessarily the right answer.Have a great day.Bye now.
Blooper
I had a comment from nicholnickel, nikelnichol...
I knew I was gonna get that wrong - nikelnichol [LAUGHING]


 Driving Test")


 Check When Turning Left")


")


 Check")


